
Today, I’d like to share a little bit about the process of sculpting a tree because I know some of you might be interested in making one yourself. The process is actually quite simple, although a bit messy, and does require a lot of patience due to the time it takes between layers to dry. But if you’re on board with all of that, then this project might be for you.
Step 1: Gather all the supplies you think you might like to use; more is better as it gives you creative options. Here are the supplies I used:
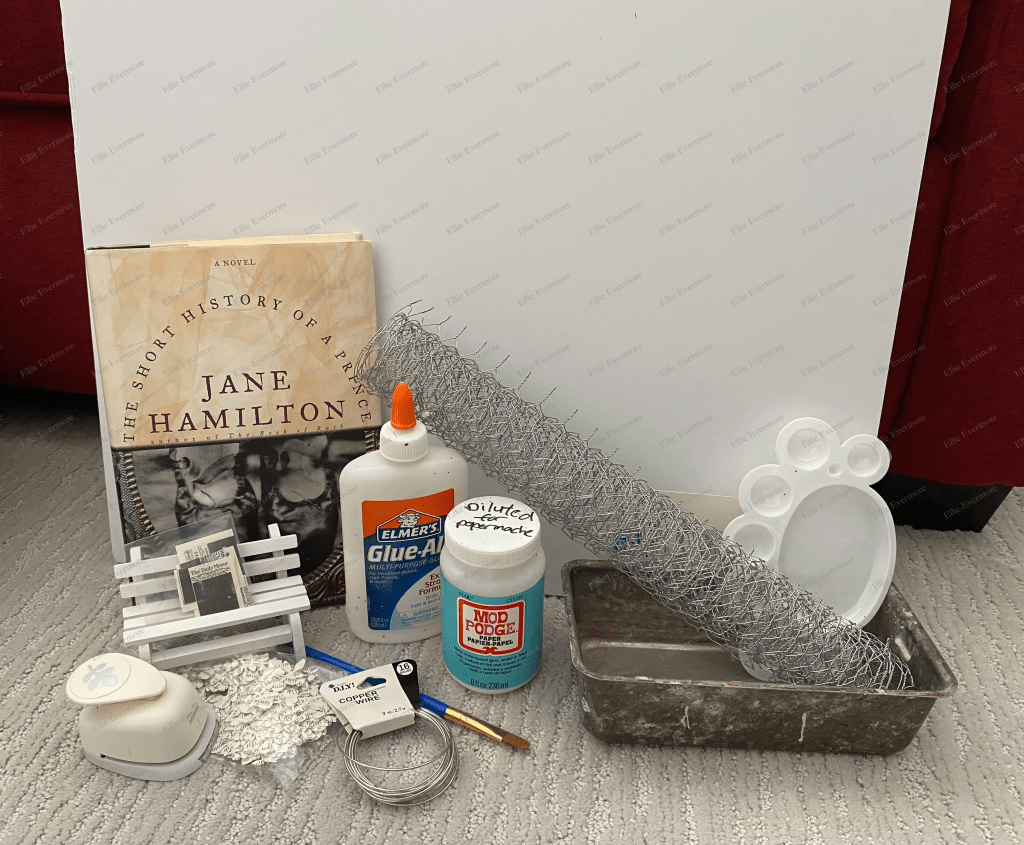
Specifics: I acquired a couple of used hard-cover books from the library. If you attend library sale days, you can sometimes get a whole bag of books for just a couple of dollars. I bought a foam board from Walmart to stabilize the base of the bottom book so that it would serve as a sturdy platform. I also got some Elmer’s glue and diluted it 1:1 with water. I used paper towels to cover the wire structure of the tree. I used needle-nosed pliers, wire cutters, 16-gauge wire, 26-gauge wire, and chicken wire to make the main structure of the tree. I used scissors to curl the paper to make the grass. I used a plastic mixing tray, a metal mixing container, and an empty Modge Podge container to mix and hold the glue. I used a leaf punch I found on Amazon to make all the leaves. I used a flat paintbrush to apply the leaves to the branches (this was quite tedious). I used a hot glue gun to attach the tree to the bottom book and apply the foam base. I found a bunch of vinyl tablecloths on clearance and bought several so I could use them for future projects. I noticed that at the end of summer, you can usually find tablecloths for a few dollars, whereas if you buy them at the beginning of summer, they can cost upwards of about $15 apiece. I had a silicone craft mat that I used underneath the tree when applying layers of paper towels and paper with glue. I printed a flag picture and then folded it like they do at funerals. I also printed some paper runes and used the leaf punch to make leaves out of them. To finish the project, I purchased a miniature park bench, lantern, and newspaper to add some symbolic final touches, and I used fishing line to hang the lantern.
Step 2: Prepare your work surface. A disposable vinyl tablecloth works great to cover your table, and a silicone craft mat can be helpful, too. Something I’ve recently found that works well are the plastic lids that cover bins/containers. A 24 in. x 18 in. is especially useful. I wish I’d had this for my tree project instead of the vinyl craft mat because the lids are sturdier and easier to clean.
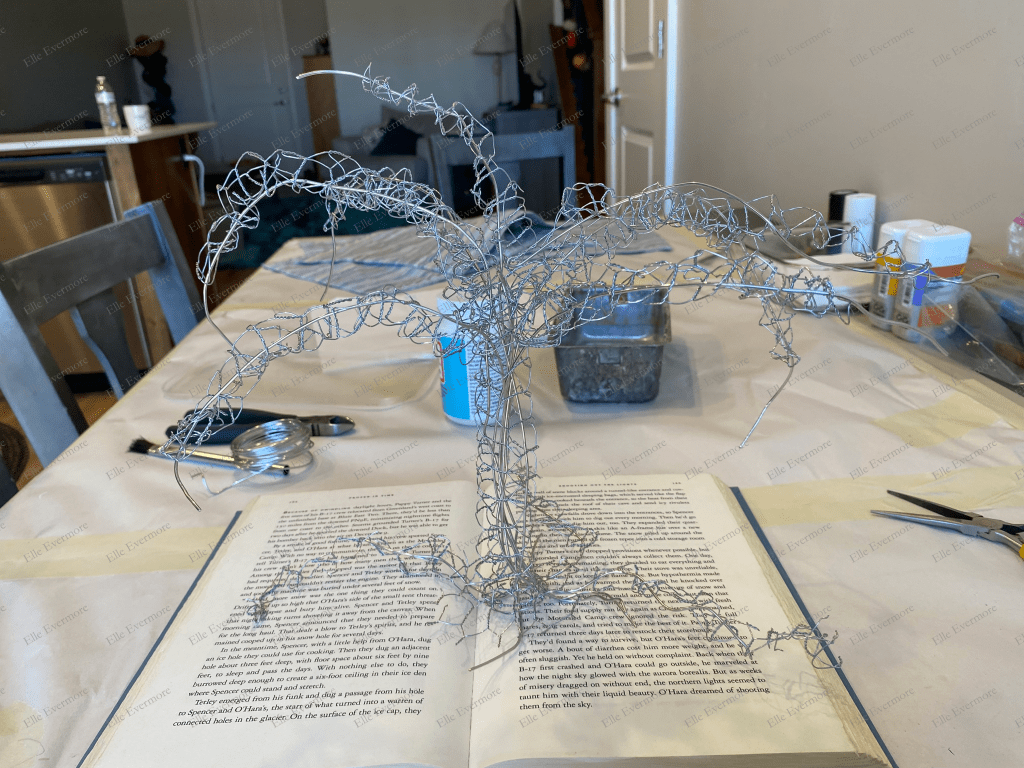
Step 3: Cut some 16-gauge wire, using any jewelry pliers to shape it into a tree-like structure. This finished wire structure is what you will use to wrap the chicken wire around. Once it’s been bent to stand on its own, cut several pieces of chicken wire and use those pieces to wrap around the wire base to form the trunk of the tree, the roots, and the branches. If you cut the chicken wire correctly, some little wire pieces will stick out and can be looped and twisted to secure and close each piece. This whole process can be a bit frustrating because wire isn’t the easiest material to work with. I found having a good pair of needle nose pliers worked the best for me to bend everything in place. I also used some 26-gauge wire to weave through the branches for added support.
Step 4: Mix one part glue to one part water. If you have an empty plastic container with a lid, you can fill it halfway with water, add glue to the top, and shake to mix. I used a lot of glue for this project but still had more than I could use. It was handy to have an empty Modge Podge container to store the remaining diluted glue.
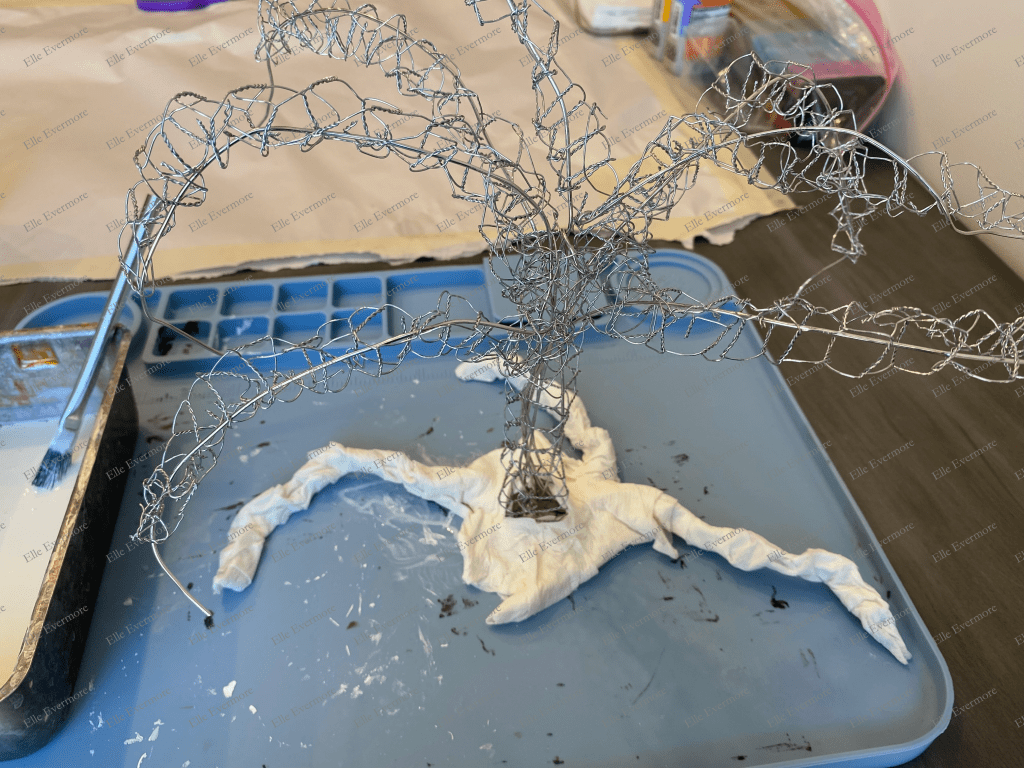
Step 5: Tear some paper towels into strips, dip them into the glue mixture, and cover the entire wire structure of the tree. I first attempted to use tissue paper, which didn’t hold up. I’d recommend newspaper because that’s perfect for paper mâché projects, but if you don’t have any and can’t obtain any, paper towels will work. Once the tree is fully covered, allow it to dry over several days. I found placing the structure in a warm room or near a sunny window helped the process go faster.
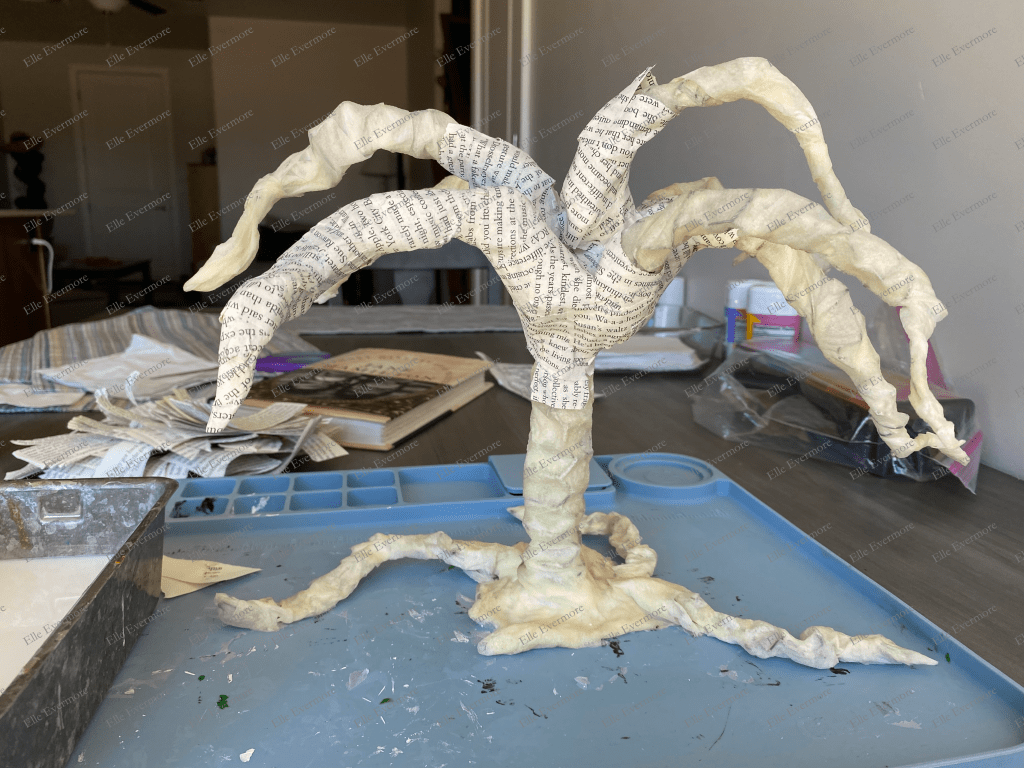
Step 6: Tear some strips from the pages of a book, dip them in glue, and cover the tree for a second time. Then, let it dry completely.
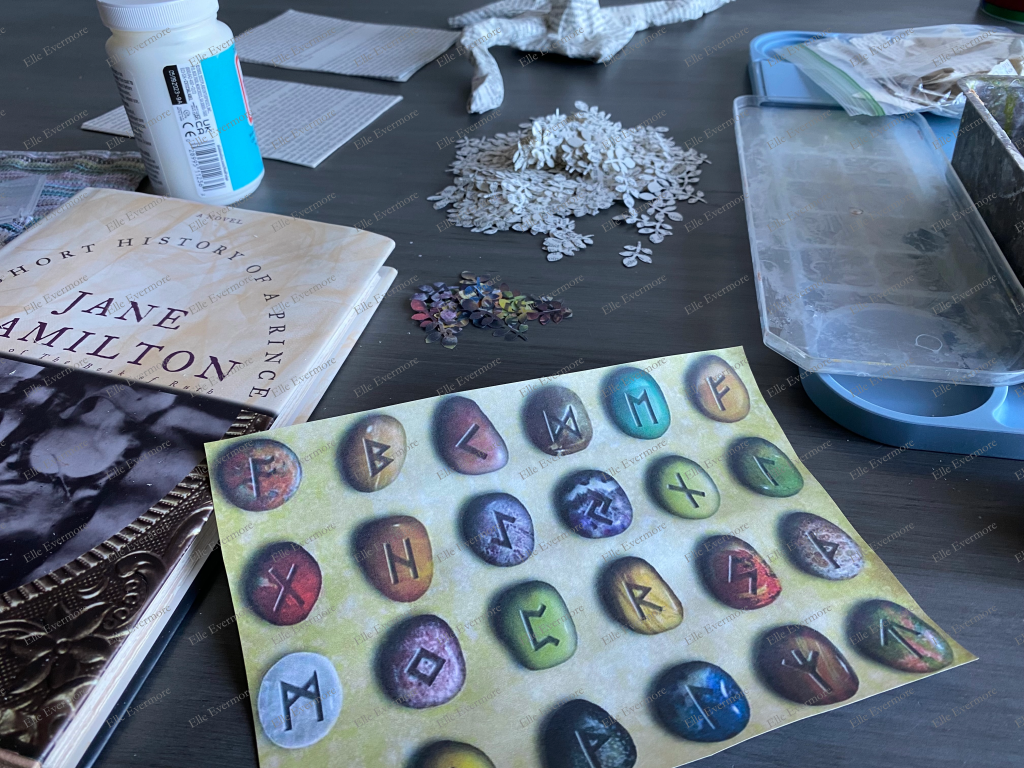
Step 7: Punch out all of the leaves and glue them onto the branches. You can use pages from a book or plain or colored paper from something else. To add symbolism, I used some paper printed with runes, giving my tree a touch of color. Most tree sculptures I’ve seen in the past don’t use any color at all, but I’d recommend doing what seems fitting for you and your project. Be creative and have fun. Always remember there are no rules when it comes to crafting. I found it best to put the tiniest glue dot at the end of each leaf and apply it to the underside of each branch before moving upward toward the top. This way, you ensure an even layer going upwards, and the top leaves don’t get in the way.
Step 8: Cut the foam board and glue it to the book that will be used for the base. I used Elmer’s glue for this part and then weighed the book down with other books on top to ensure it dried completely flat.
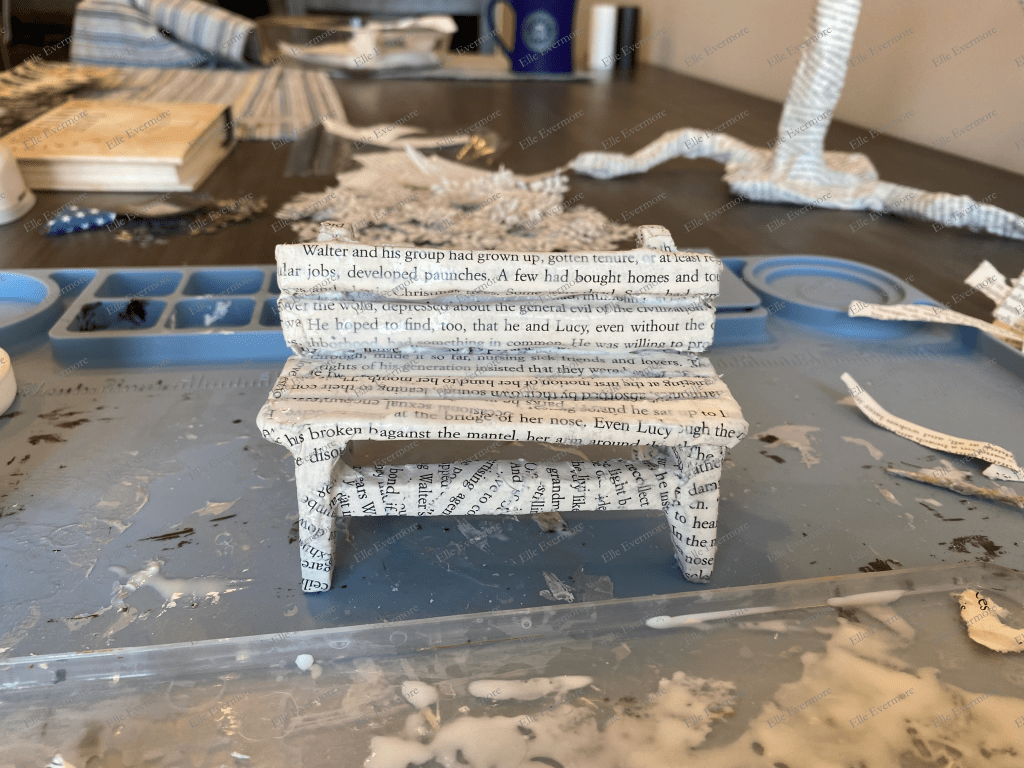
Step 9: Cover the miniature park bench in strips of book paper. This process is the same as step 6, only now you cover the bench.
Step 10: Fold the paper flag. I found a tutorial online to ensure I was folding the flag like they do at funerals.
Step 11: Affix the park bench and the tree to the book. I used hot glue for this part but was nervous since hot glue dries so fast and is much less forgiving than Elmer’s glue. But if you’re a risk taker like me, then go for it and say a little prayer beforehand if you’re afraid. And don’t worry too much if some of the glue shows; you’ll add grass around the edges of the roots and the bench, covering up any hot glue that may be showing.

Step 12: Make and apply the grass. I used the same paper from the original book I’d been tearing apart. Rip some strips the size you think you’ll need and curl them with scissors. If you’ve ever curled ribbon for gifts, you can use this same method for curling the paper. Then, use some Elmer’s glue and affix them around the base of the tree and bench where you want them.
Step 13: Hang the lantern. I used a small piece of fishing line and wrapped it around one of the branches to support the lantern.
Step 14: Glue the newspaper and the flag to the bench. I used Elmer’s glue for this part because I feared the hot glue might show through.
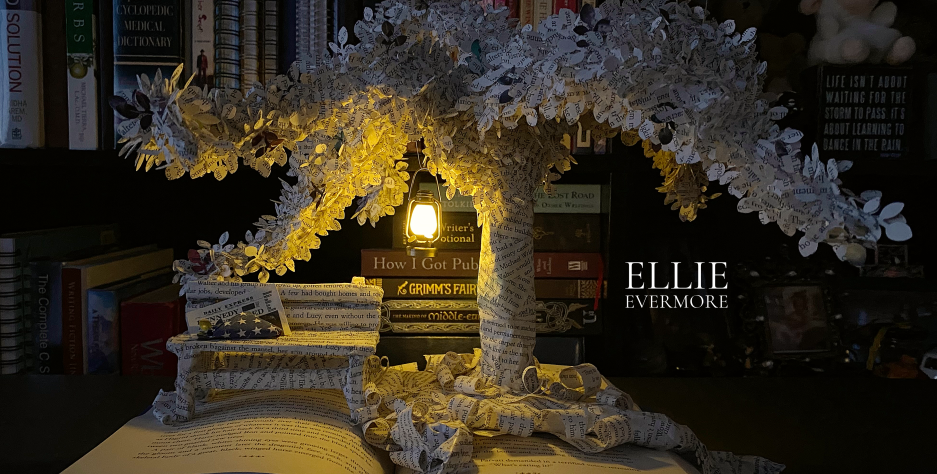
Step 15: Let everything dry, turn the lantern on, and sit back and admire all of your hard work.
* I want to apologize for not having pictures for every step of the process. When I originally made my tree, I wasn’t planning on creating a tutorial. However, after making this myself and seeing how little is out there on how to design and make one, I decided to share my creative efforts here. I hope this helps anyone interested in making one for themself. Love you guys… ~Ellie xoxo

Kudos to you for powering through all of the hard work you put into this! 👏👏👏👏👏 Because, It’s downright gorgeous! I bet you were ready to go off in a rage when you were bending the wires with those needle nose pliers. 😅😂 I imagine firing up that lantern for the first time made all of those stressful parts of the process all worth it though. 😌
LikeLiked by 1 person
Thank you… the wire was a real pain, but what really got to me was the process of trying to cover the wires. I didn’t have any newspaper and when tissue paper didn’t work, I had to figure out what else I could use. lol
I was just about ready to give up and that’s when I tried paper towels. I’m prepared for next time though. I have a huge stack of newspaper ready to go! 😅
LikeLiked by 1 person
You’re very welcome of course! And, yes! Thankfully those paper towels came through when you needed them! But those newspapers are like, I see you got those paper towels over there and all, but we don’t mess around up in here. How about you let us take care of business for ya next time! 😂
LikeLiked by 1 person
😂 that’s hilarious!
LikeLike
Oh my gosh that’s so beautiful! Great job, Ellie!
LikeLiked by 1 person
Thank you, CC ☺️❤️
LikeLiked by 1 person
You’re welcome, love ☺️❤️
LikeLiked by 1 person